Crafty! Bottle cap magnets
Ok so I know it's Thursday afternoon - but it's still Thursday, so that counts :) Here's how I made bottle cap magnets with the girls.
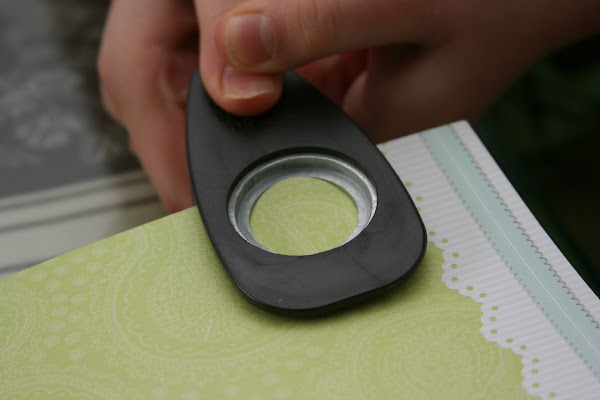
First, using the paper of your choice, punch out a one inch circle with your handy one inch circle punch that you already have (or, if you're at all like me, the one you ordered online specifically for this purpose because it would be too tedious to make one inch circles and then cut them out). Next!
Choose the embellishment - jewel, gem, whatever - (the cupcake was a scrapbook brad that I clipped the prongs off of). Or, you may have already chosen this prior to punching out your paper. Next!
Glue your paper circle to your bottle cap. If you're lucky, you can buy bottle caps in small quantities at your local craft store. I wasn't lucky, and ended up ordering 100 linerless (this is key, you don't want a rubber circle on your cap!) caps online for my project. Next!

These are Sarah's caps that she designed and I helped her with...
...and these are the caps that I made for a friend from college! She saw my picture of them on Facebook and asked me to make 13 for party favors for her daughter's birthday :) Yay! I was thrilled to be asked to do this, as they really are fun to do and I have PLENTY of supplies now lol!
I'm actually thinking of doing a table at our town's craft market this summer & seeing if there's any interest - we'll see! I have to say, and Matt & Evie agree - I think these look better than the ones we've bought for the girls. Have fun if you give it a shot yourself, or I'll be happy to make one for you :)
First, using the paper of your choice, punch out a one inch circle with your handy one inch circle punch that you already have (or, if you're at all like me, the one you ordered online specifically for this purpose because it would be too tedious to make one inch circles and then cut them out). Next!
Choose the embellishment - jewel, gem, whatever - (the cupcake was a scrapbook brad that I clipped the prongs off of). Or, you may have already chosen this prior to punching out your paper. Next!
Glue your paper circle to your bottle cap. If you're lucky, you can buy bottle caps in small quantities at your local craft store. I wasn't lucky, and ended up ordering 100 linerless (this is key, you don't want a rubber circle on your cap!) caps online for my project. Next!

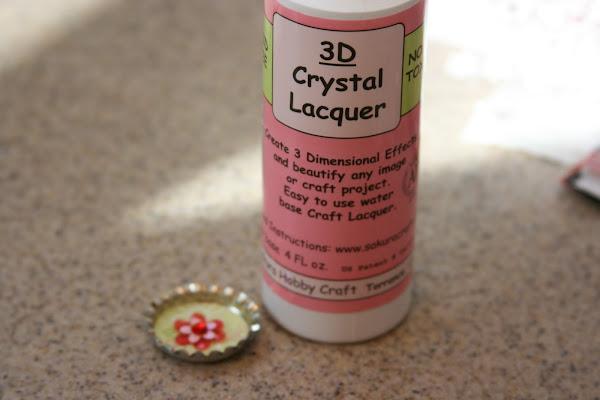
Apply a nice coat of 3D Crystal Lacquer. Again, I had to order this online. Someone said online that a 4oz bottle will do about 75 bottle caps. Next!
This is what it will look like with a good coating of the crystal lacquer. It will dry clear, nice and shiny, without any bubbles if you were careful when you applied it :) DON'T TOUCH IT for about 24 hours. Next!
Once the cap is dry, glue a magnet on the back. I chose 1/2" by 1/8" magnets, but 1/2" by 1/4" might be better. I'm still fiddling with glues, but so far Gorilla Super Glue seems to bond the best and dry the fastest. Rough up the surface of the cap on the back before you glue it on.
And that's it! Evie REALLY had fun making these, and she seems to be under the impression that all 100 caps are for her. Um, no. These are the ones she's made for herself...
These are Sarah's caps that she designed and I helped her with...
...and these are the caps that I made for a friend from college! She saw my picture of them on Facebook and asked me to make 13 for party favors for her daughter's birthday :) Yay! I was thrilled to be asked to do this, as they really are fun to do and I have PLENTY of supplies now lol!
I'm actually thinking of doing a table at our town's craft market this summer & seeing if there's any interest - we'll see! I have to say, and Matt & Evie agree - I think these look better than the ones we've bought for the girls. Have fun if you give it a shot yourself, or I'll be happy to make one for you :)


Def. gonna have to try this! SO CUTE!
ReplyDeleteNext!
Adorable! Seriously! I have more wine corks than I do bottle caps though.... ;)
ReplyDeleteSo cute! I may have to try this myself. They'd be great for just about any party since you can get scrapbooking stuff for everything these days!
ReplyDeleteSOOO Cute! If I had all the stuff already I might give it a shot but since I don't I'll just oogle over yours. Question for ya... the ones you made for your friend... are they a bracelet? Ohhh another question... are they jagged edges, like will they scratch or cut a little one?
ReplyDeleteThose are ADORABLE!!! And I am totally one of those people that buys a whole bunch of craft supplies for one craft. But it's a good thing you did!
ReplyDeleteSo so cute!! I really love the little cupcake ones! You should definitely set up a table and sell them!
ReplyDeleteThey're adorable! I love the cupcake ones (and now WANT a cupcake).
ReplyDeleteI'm hoping to make a Michael's run tomorrow so I may try these soon.
They turned out so cute!! I just wrote down all of the items so I can check my local craft store.
ReplyDeleteSo stinking cute! I'm sharing this idea with a friend who has 3 & 7 year old girls, mine are sadly too old for these now!
ReplyDeleteI love, love, love these. But, I'm wondering, is there any way to make them work with real bottle caps? I'd love to make use of my son's bottle cap collection. (They have that rubber seal in them, though.)
ReplyDeleteI love these - I think I will show them to my 10 year old and see if she wants to make them as party favors!!!
ReplyDeleteThanks for showing us how to do it!!
~Becca
LOVE LOVE LOVE! Would you mind sharing the link where you ordered the supplies with me? My girls would LOVE to do these (and so would I!), looks like so much fun!
ReplyDelete